Tyler McGinnis
Check your version
This post assumes you're using React Router v6. If not, find your version below.In the beginning of the web, there were just documents with links between them. When a browser made a request to a server for a particular page, the server would find the HTML file stored on its hard disk for that page and send it back to the browser. There was no dynamic content, and there definitely wasn't any JavaScript. Just pages and links.
Not long after that, someone had the great idea to pre-process the HTML before it was sent to the client. The idea was simple - every time a browser requests a page, generate the HTML on-the-fly. Cookies, authentication headers, and form data could be used to tell the difference between requests, letting the browser generate different HTML for each request. This one innovation, which we now call server rendering, is what sparked the Web 2.0 era of the late 1990s and early 2000s.
Server rendering changed the game, but it wasn't without it's tradeoffs. The problem was every change in the page's content required a full-page refresh. That meant sending a request to the server, waiting for the server to generate the HTML, waiting for the request to come back, and then displaying the new HTML content. It worked, but it wasn't efficient.
Then in 1999 AJAX was invented to aid this problem. AJAX, which stands for "Asynchronous JavaScript and XML", allowed browsers to send and receive messages from the server using JavaScript without needing to reload the page. This ushered in the next era of rich, dynamically generated web apps - the most famous being Google Maps and Gmail.
About a decade later, another shift in the way we build web applications took place. The idea was simple, instead of consulting the server for every new page and then sprinkling in dynamic content with Ajax, what if we got everything we needed from the server on the initial request? This would make the whole app, especially route transitions, feel much quicker since we'd already have everything locally needed to render the new page without consulting a server. This concept even had its own name, "Single Page Applications" or SPAs, and it was popularized by JavaScript frameworks like Angular.js and React.
However, like all nice things, SPAs weren't without their tradeoffs. By bundling the entire application into a single payload, the entire JavaScript ecosystem became numb to the downsides of large bundles.
In this post, we'll take everything we've learned from the history of the web and apply it to building a modern, server-rendered React application. We'll see how, by minimizing the tradeoffs of each approach, we can improve the performance of our app with server-rendering while maintaining the "snappy" feel that SPAs enable.
Get the code
You can find all the code for this post on Github at @uidotdev/react-router-server-rendering and the final project we'll be building at rrssr.ui.dev.
If server rendering is a new concept to you, it's important to grasp the big picture of how all the pieces fit together before diving into the details.
SSR - The Overview
- 1. A user types your URL into their web browser and hits enter
- 2. Your server sees there is a
GETrequest - 3. The server renders your React app to an HTML string, wraps it inside of a standard HTML doc (
DOCTYPEand all), and sends the whole thing back as a response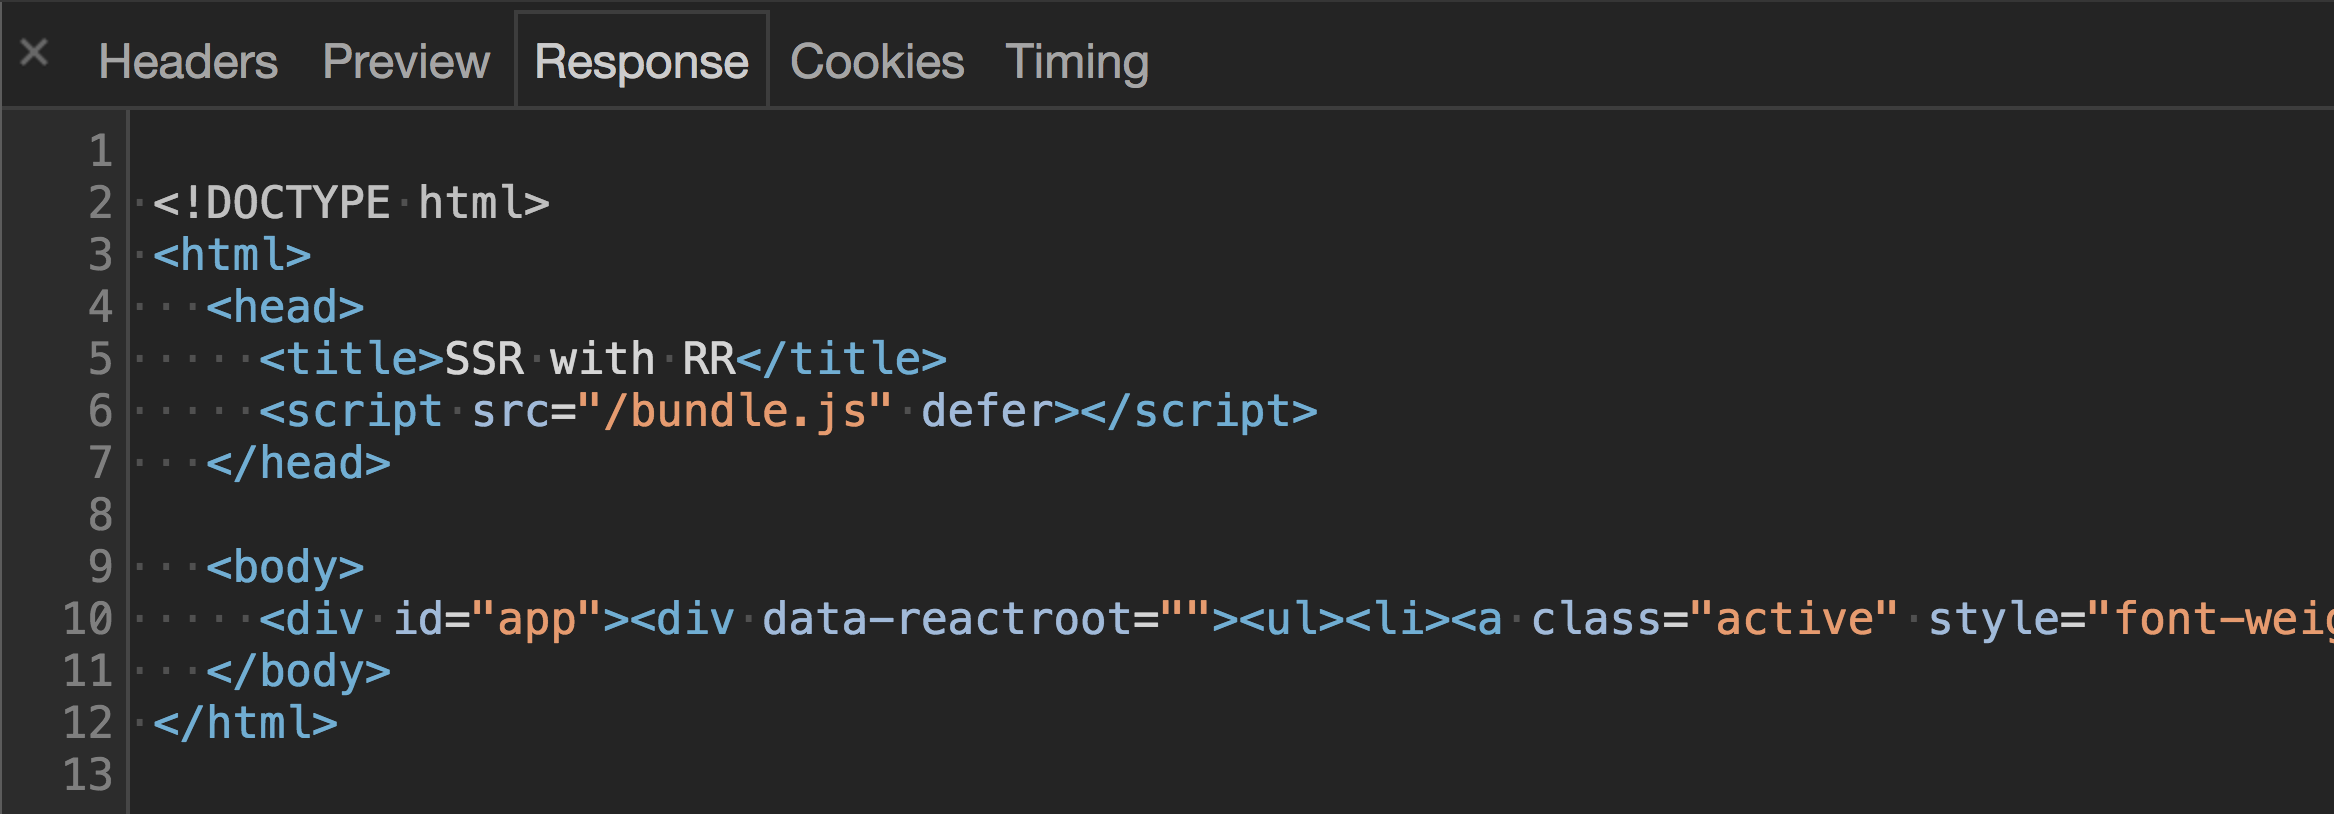
- 4. The browser sees it got an HTML document back from the server and its rendering engine goes to work rendering the page
- 5. Once done, the page is viewable and the browser starts downloading any
<script>s located in the document
- 6. Once the scripts are downloaded, React takes over and the page becomes interactive
Notice that with server rendering, the response the browser gets from the server is raw HTML that is immediately ready to be rendered. This is the opposite of what happens with regular client-side rendering which just spits back a blank HTML document with a JavaScript bundle.
By sending back a finished HTML document, the browser is able to show the user some UI immediately without having to wait for the JavaScript the finish downloading.
Now that we get the big picture, let's work on creating the foundation for what will become a server-rendered React with React Router application.
Breaking down our list, we know there are three things we're going to need up front.
Our Immediate Needs
- 1. A React component - even just a basic one that renders "Hello World" for now
- 2. A server which spits back a React app after it's wrapped it in some HTML structure
- 3. A way for React to pick up from where the server-rendered HTML left off and add in any event listeners to the existing markup where needed
As always when dealing with React, we're going to need to talk about webpack at some point. For maximum knowledge gain, we're not going to use Create React App which means we'll have to roll our own configuration.
For the sake of keeping this tutorial as focused as possible, I'll paste the webpack.config.js file and the package.json file below then highlight the important parts.
Webpack Config
const path = require("path");const webpack = require("webpack");const nodeExternals = require("webpack-node-externals");const MiniCssExtractPlugin = require("mini-css-extract-plugin");const browserConfig = {mode: "production",entry: "./src/browser/index.js",output: {path: path.resolve(__dirname, "dist"),filename: "bundle.js",},module: {rules: [{ test: /\.(js)$/, use: "babel-loader" },{ test: /\.css$/, use: ["css-loader"] },],},plugins: [new webpack.DefinePlugin({__isBrowser__: "true",}),],};const serverConfig = {mode: "production",entry: "./src/server/index.js",target: "node",externals: [nodeExternals()],output: {path: path.resolve(__dirname, "dist"),filename: "server.js",},module: {rules: [{ test: /\.(js)$/, use: "babel-loader" },{test: /\.css$/,use: [MiniCssExtractPlugin.loader, "css-loader"],},],},plugins: [new MiniCssExtractPlugin(),new webpack.DefinePlugin({__isBrowser__: "false",}),],};module.exports = [browserConfig, serverConfig];
Notice we have two different configurations, browserConfig for the browser and serverConfig for the server.
browserConfig is going to take the code that lives at /src/browser/index.js, run it through the babel-loader (which will run it through the env and react presets), run it through css-loader (which will allow us to import our CSS file), then spit out the modified, bundled code at /dist/bundle.js.
browserConfig also uses DefinePlugin to add an __isBrowser__ property to the global namespace (window) so we know when we're in the browser.
serverConfig is similar. It's going to take the code that lives at /src/server/index.js, run it through the babel-loader and css-loader, then spit it out at ./dist/server.js.
externals makes it so the server's node_modules aren't bundled with the output.
target tells webpack to compile for usage in a "Node.js like environment" and also helps externals know what to ignore (built in node modules like path, fs, etc).
MiniCssExtractPlugin is going to extract all our CSS into a single file then output it as main.css inside of the same dist folder.
tl;dr. The final client code is going to be bundled and put at dist/bundle.js and the final server code will be bundled and put at dist/server.js.
Next, let's take a quick look at our package.json file.
{"name": "react-router-server-rendering","description": "Server rendering with React Router.","scripts": {"build": "webpack","start": "node dist/server.js","dev": "webpack && node dist/server.js"},"babel": {"presets": ["@babel/preset-env", "@babel/preset-react"],"plugins": ["@babel/plugin-proposal-object-rest-spread"]},"devDependencies": {"@babel/core": "^7.14.6","@babel/plugin-proposal-object-rest-spread": "^7.14.7","@babel/preset-env": "^7.14.7","@babel/preset-react": "^7.14.5","babel-loader": "^8.2.2","css-loader": "^5.2.6","mini-css-extract-plugin": "^2.0.0","webpack": "^5.42.0","webpack-cli": "^4.7.2","webpack-node-externals": "^3.0.0"},"dependencies": {"cors": "^2.8.5","express": "^4.17.1","history": "^5.0.0","isomorphic-fetch": "^3.0.0","react": "^17.0.2","react-dom": "^17.0.2","react-router-dom": "^6.0.0-beta.0","serialize-javascript": "^6.0.0"},"version": "1.0.0","main": "index.js"}
The big takeaway here is npm run dev will run webpack && node dist/server.js which tells Webpack to bundle our code and tells Node to start our node server.
The build and start commands are for hosting our server on a platform like Heroku.
Now that our build process is set up, let's build our app.
According to our webpack.config.js file, inside of our src folder, we're going to have a server folder and a browser folder.
Let's also add a shared folder for all the functionality which will be shared between the two.
- webpack.config.js
- package.json
- src
- browser
- server
- shared
Now if you'll remember when we broke down the initial SSR process, there were three items we were going to need first.
Our Immediate Needs
- 1. A React component - even just a basic one that renders "Hello World" for now
- 2. A server which spits back a React app after it's wrapped it in some HTML structure
- 3. A way for React to pick up from where the server-rendered HTML left off and add in any event listeners to the existing markup where needed
We can handle #1 pretty easily. Let's make an App component inside of the shared/App.js and have it render "Hello World".
// src/shared/App.jsimport * as React from "react";export default function App() {return <div>Hello World</div>;}
Done and done. Now, onto #2 - "A server which spits back a React app after it's wrapped it in some HTML structure".
First, let's create an index.js file inside of our src/server folder. We're going to use express.js so let's get the basics set up.
// src/server/index.jsimport express from "express";import cors from "cors";const app = express();app.use(cors());app.use(express.static("dist"));const PORT = process.env.PORT || 3000;app.listen(PORT, () => {console.log(`Server is listening on port: ${PORT}`);});
Simple enough. The biggest takeaway is that we're serving up our dist folder. If you remember from earlier, dist is where we have Webpack putting all our final bundled code.
Now we want to make it so anytime our server receives a GET request, we send back the HTML skeleton along with the markup from our App component inside of it. To do this, we'll use React's renderToString which takes in a React element and converts it into an HTML string.
import express from "express";import cors from "cors";import ReactDOM from "react-dom/server";import * as React from "react";import App from "../shared/App";const app = express();app.use(cors());app.use(express.static("dist"));app.get("*", (req, res, next) => {const markup = ReactDOM.renderToString(<App />);res.send(`<!DOCTYPE html><html><head><title>SSR with React Router</title></head><body><div id="app">${markup}</div></body></html>`);});const PORT = process.env.PORT || 3000;app.listen(PORT, () => {console.log(`Server is listening on port: ${PORT}`);});
Lastly, we need to include a reference to our bundle.js file and our main.css file, both located in dist, and both created by Webpack.
<head><title>SSR with React Router</title><script src="/bundle.js" defer></script><link href="/main.css" rel="stylesheet" /></head>
Now whenever a GET request is made to our server, it'll send back some HTML which includes our <App /> component, a script referencing the bundle.js file, and a link referencing the main.css file.
Next up, #3 - "A way for React to pick up from where the server-rendered HTML left off and add in any event listeners to the existing markup where needed".
This one sounds more difficult than it is. Typically when you want to tell the browser about your React app, you call ReactDOM.render passing it the element and the DOM node you want to render to.
ReactDOM.render(<App />,document.getElementById('app))
Since we're initially rendering our app on the server, instead of calling ReactDOM.render, we want to call ReactDOM.hydrate.
ReactDOM.hydrate(<App />,document.getElementById('app))
hydrate tells React that you've already created the markup on the server and instead of re-creating it on the client, it should preserve it, but attach any needed event handlers to it.
Let's make a new index.js file inside of src/browser where we can import our App component and call hydrate.
// src/browser/index.jsimport * as React from "react";import ReactDOM from "react-dom";import App from "../shared/App";ReactDOM.hydrate(<App />, document.getElementById("app"));
Note that we're mounting App to an element with an id of app. This coincides with the HTML that the server will respond with that we created earlier.
res.send(`<!DOCTYPE html><html><head><title>SSR with React Router</title><script src="/bundle.js" defer></script><link href="/main.css" rel="stylesheet"></head><body><div id="app">${markup}</div></body></html>`);
At this point, assuming you've already ran npm install and npm run dev, when you visit localhost:3000 you should see "Hello World".
That "Hello World" was initially rendered on the server then when it got to the client and the bundle.js file loaded, React took over.
Cool. Also, anticlimactic.
Let's mix things up a big so we can really see how this works. What if instead of rendering "Hello World", we wanted App to render Hello {props.name}.
export default function App(props) {return <div>Hello {props.name}</div>;}
Now whenever we create our App element, we need to pass it a name prop - React 101.
To do this, we need to look at where we're creating the App element. There are two places, in server/index.js for when we server render and in of browser/index.js for when the browser picks it up.
Let's modify both of those and add a name prop of Tyler.
// browser/index.jsReactDOM.hydrate(<App name="Tyler" />, document.getElementById("app"));
// server/index.jsconst markup = ReactDOM.renderToString(<App name="Tyler" />);
Now when then app loads we see "Hello Tyler".
At this point we're successfully passing data to our App component, but now is a good opportunity to see the exact moment when React "hydrates" on the client. We can see this in action by continuing to pass Tyler to name on the server but switching the client name to another name, like Mikenzi.
// server/index.jsconst markup = ReactDOM.renderToString(<App name="Tyler" />);// browser/index.jsReactDOM.hydrate(<App name="Mikenzi" />, document.getElementById("app"));
Now when you refresh the app, you'll initially see Hello Tyler, which is what was rendered on the server, then when React takes over on the client, you'll see Hello Mikenzi.
Note that this is just for demonstration purposes only. If you were to look at the console, you'd actually see a warning -
Here's what the React docs have to say about this.
Identical Rendering
"React expects that the rendered content is identical between the server and the client. It can patch up differences in text content, but you should treat mismatches as bugs and fix them. In development mode, React warns about mismatches during hydration. There are no guarantees that attribute differences will be patched up in case of mismatches. This is important for performance reasons because in most apps, mismatches are rare, and so validating all markup would be prohibitively expensive."
When you're just rendering a component with no data, it's not difficult to have the server-rendered and client rendered content be identical - as we saw when we just rendered <App />. When you add in data, it gets a little more complex. You need to make sure that the component is rendered with the same data (or props) on both the client and server.
So how would we go about doing this? We know since the app is going to be server rendered first, any initial data our app needs is going to have to originate on the server. With that in mind, in order to make sure the server and the client are the same, we need to figure out how to get the same data that originated on the server, down to the client.
Well, there's a pretty "old school" solution that works perfectly. Let's stick it on the global namespace (window) so the client can reference it when it picks up our app.
...import serialize from "serialize-javascript"app.get("*", (req, res, next) => {const name = 'Tyler'const markup = renderToString(<App name={name}/>)res.send(`<!DOCTYPE html><html><head><title>SSR with React Router</title><script src="/bundle.js" defer></script><link href="/main.css" rel="stylesheet"><script>window.__INITIAL_DATA__ = ${serialize(name)}</script></head><body><div id="app">${markup}</div></body></html>`)})
Now, on the client, we can grab the name from window.__INITIAL_DATA__.
ReactDOM.hydrate(<App name={window.__INITIAL_DATA__} />,document.getElementById("app"));
Cool. We've solved sharing initial data from the server to the client by using the window object.
At this point, we've covered all the fundamentals of server rendering. Let's take it a bit further now.
Odds are you're never going to have static initial data in your app. Your data will most likely be coming from an API somewhere. Let's modify our server so that it fetches some data before it returns the HTML. The end goal is to build something like this, using the Github API to fetch popular repositories for a specific language.
The first thing we'll want to do is make a function that takes in a language and, using the Github API, fetches the most popular repos for that language. Because we'll be using this function on both the server and the client, let's make an api.js file inside of the shared folder and we'll call the function fetchPopularRepos.
// shared/api.jsimport fetch from "isomorphic-fetch";export function fetchPopularRepos(language = "all") {const encodedURI = encodeURI(`https://api.github.com/search/repositories?q=stars:>1+language:${language}&sort=stars&order=desc&type=Repositories`);return fetch(encodedURI).then((data) => data.json()).then((repos) => repos.items).catch((error) => {console.warn(error);return null;});}
Now we need to figure out when to invoke this function. The idea is when a GET request is made to our server, instead of calling renderToString immediately, we first fetch the popular repositories then call it after giving our React component the fetched data.
// src/server/index.js...import { fetchPopularRepos } from '../shared/api'app.get("*", (req, res, next) => {fetchPopularRepos().then((data) => {const markup = ReactDOM.renderToString(<App serverData={data} />)res.send(`<!DOCTYPE html><html><head><title>SSR with React Router</title><script src="/bundle.js" defer></script><link href="/main.css" rel="stylesheet"><script>window.__INITIAL_DATA__ = ${serialize(data)}</script></head><body><div id="app">${markup}</div></body></html>`)})})
Now when a GET request is made to our server, we get back not only the React UI, but also the initial data coming from the Github API.
Next, let's update the App component to be able to properly handle the new serverData prop it's receiving. Instead of handling it all in App, let's make a new component called Grid that deals with mapping over all the repos.
// src/shared/App.jsimport * as React from "react";import Grid from "./Grid";import "./styles.css";export default function App({ serverData }) {return (<div><Grid data={serverData} /></div>);}
// src/shared/Grid.jsimport * as React from "react";export default function Grid({ data }) {return (<ul className="grid">{data.map(({ name, owner, stargazers_count, html_url }, i) => (<li key={name}><h2>#{i + 1}</h2><h3><a href={html_url}>{name}</a></h3><p>by<a href={`https://github.com/${owner.login}`}>@{owner.login}</a></p><p>{stargazers_count.toLocaleString()} stars</p></li>))}</ul>);}
Solid. Now when our app is requested, the server fetches the data the app needs and the HTML response we get has everything we need to render the initial UI.
At this point we've done a lot, but our app still has a long way to go, especially around routing.
React Router is a declarative, component-based approach to routing. However, because we're dealing with server-side rendering, we're going to abandon that paradigm and move all of our routes to a central route configuration.
The reason for this is because both the client and the server are going to share the same routes. The client because it obviously needs to know which components to render as the user navigates around our app and the server because it needs to know which data to fetch when the user requests a specific path.
To do this, we'll make a new file inside of our shared folder called routes.js and in that represent our routes as an array of objects, each object representing a new route.
In the case of our app, we'll have two routes - / and /popular/:id. / will render the (soon to be created) Home component and /popular/:id will render our Grid component.
// src/shared/routes.jsimport Home from "./Home";import Grid from "./Grid";const routes = [{path: "/",component: Home,},{path: "/popular/:id",component: Grid,},];export default routes;
Before we continue, let's hurry and create the Home component. It'll simply render an h2 element.
// src/shared/Home.jsimport * as React from "react";export default function Home() {return <h2 className="heading-center">Select a Language</h2>;}
Now I mentioned earlier that the reason the server needs to have access to a central route config is because "it needs to know which data to fetch when the user requests a specific path". What that means is that we're going to put any data requests that a specific route needs in the route object itself.
What that will do is it will allow the server to say "It looks like the user is requesting the /popular/javascript route. Is there any data that needs to be fetched before we send back a response? There is? OK fetch it.".
// shared/routes.jsimport Home from "./Home";import Grid from "./Grid";import { fetchPopularRepos } from "./api";const routes = [{path: "/",component: Home,},{path: "/popular/:id",component: Grid,fetchInitialData: (path = "") => fetchPopularRepos(path.split("/").pop()),},];export default routes;
Again, by adding a fetchInitialData property to our /popular/:id route, when a user makes a GET request with that path, we'll know we need to invoke fetchInitialData before we can send a response back to the client.
Let's head back over to our server and see what these changes will look like.
The first thing we need to do is figure out which route, if any, match the current request to the server. For example, if the user requests the / page, we need to find the route with the path of /. Luckily for us, React Router exports a matchPath method that does exactly this.
// server/index.js...import { matchPath } from "react-router-dom"import routes from '../shared/routes'app.get("*", (req, res, next) => {const activeRoute = routes.find((route) =>matchPath(route.path, req.url)) || {}})...
Now, activeRoute will be the route of whatever page the user was requesting (req.url).
The next step is to see if that route requires any data. We'll check if the activeRoute has a fetchInitialData property. If it does, we'll invoke it passing it the current path, if it doesn't, we'll just continue on.
app.get("*", (req, res, next) => {const activeRoute =routes.find((route) => matchPath(route.path, req.url)) || {};const promise = activeRoute.fetchInitialData? activeRoute.fetchInitialData(req.path): Promise.resolve();promise.then((data) => {}).catch(next);});
Now we have a promise which is going to resolve with the data, or nothing. As we've done previously, we want to grab that and both pass it to our component as well as put it on the window object so the client can pick it up later.
app.get("*", (req, res, next) => {const activeRoute =routes.find((route) => matchPath(route.path, req.url)) || {};const promise = activeRoute.fetchInitialData? activeRoute.fetchInitialData(req.path): Promise.resolve();promise.then((data) => {const markup = ReactDOM.renderToString(<App serverData={data} />);res.send(`<!DOCTYPE html><html><head><title>SSR with React Router</title><script src="/bundle.js" defer></script><link href="/main.css" rel="stylesheet"><script>window.__INITIAL_DATA__ = ${serialize(data)}</script></head><body><div id="app">${markup}</div></body></html>`);}).catch(next);});
Getting closer. Now instead of always fetching the repos, we’re only fetching them if the route that is being rendered has a fetchInitialData property.
Now that we're fetching the correct data on our server based on the route the user requested, let's add in some client-side routing as well.
As always, we need to wrap our main component (App) inside of React Router's BrowserRouter component on the client. We'll do that inside of src/browser/index.js since that's where we're rendering App.
import * as React from "react";import ReactDOM from "react-dom";import App from "../shared/App";import { BrowserRouter } from "react-router-dom";ReactDOM.hydrate(<BrowserRouter><App /></BrowserRouter>,document.getElementById("app"));
Now, because we've given control of the client over to React Router, we also need to do the same on the server so they match. Because we're on the server, it doesn't make sense to render a component called BrowserRouter. Instead, we'll use React Router's StaticRouter component.
It's called StaticRouter since the location never actually changes. It takes one required prop, location, which is the current location being requested by the user (req.url).
// server/index.js...import { StaticRouter } from 'react-router-dom/server';...const markup = ReactDOM.renderToString(<StaticRouter location={req.url} ><App serverData={data} /></StaticRouter>)...
Now before we render our client-side Routes, let's create a few more components that we'll need – Navbar, ColorfulBorder, and NoMatch. We'll copy/paste these since there isn't anything related to server rendering happening here.
// src/shared/ColorfulBorder.jsimport * as React from "react";export default function ColorfulBorder() {return <div className="border-container" />;}
// src/shared/NoMatch.jsimport * as React from "react";export default function NoMatch() {return <h2 className="heading-center">Four Oh Four</h2>;}
// src/shared/Navbar.jsimport * as React from "react";import { NavLink } from "react-router-dom";const languages = [{name: "All",param: "all",},{name: "JavaScript",param: "javascript",},{name: "Ruby",param: "ruby",},{name: "Python",param: "python",},{name: "Java",param: "java",},];export default function Navbar() {return (<ul className="nav">{languages.map(({ name, param }) => (<li key={param}><NavLinkactiveStyle={{ fontWeight: "bold" }}to={`/popular/${param}`}>{name}</NavLink></li>))}</ul>);}
Now let's render some client-side routes. We already have our routes array, so we just need to map over that to create our Routes. We also need to make sure that we pass the component that is being rendered the fetchInitialData property, if it exists, so the client can invoke it if it doesn't already have the data from the server.
// src/shared/App.jsimport * as React from "react";import routes from "./routes";import { Route, Routes } from "react-router-dom";import Navbar from "./Navbar";import NoMatch from "./NoMatch";import ColorfulBorder from "./ColorfulBorder";import "./styles.css";export default function App({ serverData = null }) {return (<React.Fragment><ColorfulBorder /><div className="container"><Navbar /><Routes>{routes.map((route) => {const { path, fetchInitialData, component: C } = route;return (<Routekey={path}path={path}element={<C data={serverData} fetchInitialData={fetchInitialData} />}/>);})}<Route path="*" element={<NoMatch />} /></Routes></div></React.Fragment>);}
At this point our app is coming along nicely, but there's one glaring issue. As is, the app works on the initial render, but any subsequent route transitions would break. Any idea why?
It's because the only place we're fetching the repo's data is on the server, and no where on the client. When the user first loads our app and gets the response from the server, the app contains all the markup and data it needs to render. Then, as the user navigates around the app, since we're using React and React Router, no subsequent requests to our server are made and no more repo data is fetched.
Said differently, you can think of our app as having three phases - server rendered → client pickup → client navigation. Anything that happens after "client pickup" is in the hands of React and React Router. What this means is that just because we fetched the initial data on the server, that doesn't mean that data is going to be valid throughout the whole lifetime of the user using our app. As soon as the user navigates away from the initial server rendered page, we need to have our client code be responsible for fetching any new pieces of data it needs.
To do this, naturally, we need to fetch repo data from the client only if we don't already have the data from the server. To do this, we need to know if we're rendering on the client, and if we are, if it's the initial render. If it is, that would mean we already have the data via window.__INITIAL_DATA__ and we shouldn't fetch it again.
If you remember way back to the start of this post, in our browserConfig in our webpack config file, we used webpack.DefinePlugin to add a __isBrowser__ property to window on the client. This is how we can tell if we're rendering on the client or on the server.
Using that, let's add a local repos state to our Grid component whose default value will be window.__INITIAL_DATA__ if we're on the client or the data prop if we're on the server.
// src/shared/Grid.jsexport default function Grid ({ data }) {const [repos, setRepos] = React.useState(() => {return __isBrowser__? window.__INITIAL_DATA__: data})...}
Now that we have repos, our main goal is to keep it up to date with whatever language the user selects.
If you'll remember, the Route for our Grid component looks like this.
{path: '/popular/:id',component: Grid,fetchInitialData: (path = '') =>fetchPopularRepos(path.split('/').pop())}
We're using a URL Parameter (id) to represent the language. We can get access to that URL parameter, and therefor the language, via React Router's useParams Hook.
// src/shared/Grid.jsimport { useParams } from 'react-router-dom'export default function Grid ({ data }) {const [repos, setRepos] = React.useState(() => {return __isBrowser__? window.__INITIAL_DATA__: data})const { id } = useParams()...}
Now that we have our repos state and we've grabbed the language from the URL parameter, the next thing we need to do is figure out how to fetch that language's repos and update our local repos state. To help us do that, let's add a loading state to our component.
loading, naturally, will let us know if we're currently in the process of fetching new repositories. Initially, we want loading to be false if we already have repos, which means they were created on the server.
export default function Grid ({ data }) {const [repos, setRepos] = React.useState(() => {return __isBrowser__? window.__INITIAL_DATA__: data})const { id } = useParams()const [loading, setLoading] = React.useState(repos ? false : true)if (loading === true) {return <i className='loading'>🤹♂️</i>}...}
Finally, whenever the user selects a new language from our Navbar, we want to fetch the new popular repositories for that language and update our repos state. To fetch the new popular repositories, we can use the fetchInitialData prop that we passed in when we created our Routes.
{routes.map(({ path, fetchInitialData, component: C }) => (<Routekey={path}path={path}element={<C data={serverData} fetchInitialData={fetchInitialData} />}/>));}
The next question is when should we invoke fetchInitialData? If you're familiar with the useEffect Hook, you'll know you can pass to it an array of dependencies as its second argument. Whenever one of the elements in the array changes, React will re-apply the effect. That means if we pass our id URL parameter as an element in the effect's dependency array, React will only re-apply the effect when it changes. Perfect.
export default function Grid({ fetchInitialData, data }) {const [repos, setRepos] = React.useState(() => {return __isBrowser__ ? window.__INITIAL_DATA__ : data;});const [loading, setLoading] = React.useState(repos ? false : true);const { id } = useParams();React.useEffect(() => {setLoading(true);fetchInitialData(id).then((repos) => {setRepos(repos);setLoading(false);});}, [id]);if (loading === true) {return <i className="loading">🤹♂️</i>;}return <ul className="grid">...</ul>;}
And just like like, we're done...almost.
Can you spot any issues with our current implementation of Grid? Here's a hint - it has to do with our effect.
By default, React will invoke the effect after the first render of the component and then anytime an element in the dependency array changes. Typically this is fine, except in our case. We only want to run the effect on the initial render if repos is falsy. Similar to loading, if repos isn't falsy that means that they were created on the server and there's no use in re-fetching them. To solve this, we'll use React's useRef Hook.
useState vs useRef
Put simply, useRef is similar to useState in that it lets us persist a value across renders, but unlike useState, useRef won't trigger a re-render. This is helpful in our case because we don't want to cause a re-render of the component when we update our ref's value.
For more info, visit Understanding React's useRef Hook.
export default function Grid ({ fetchInitialData, data }) {const [repos, setRepos] = React.useState(() => {return __isBrowser__? window.__INITIAL_DATA__: data})const [loading, setLoading] = React.useState(repos ? false : true)const { id } = useParams()const fetchNewRepos = React.useRef(repos ? false : true)React.useEffect(() => {if (fetchNewRepos.current === true) {setLoading(true)fetchInitialData(id).then((repos) => {setRepos(repos)setLoading(false)})} else {fetchNewRepos.current = true}}, [id, fetchNewRepos])...}
On the initial render of Grid, we set our fetchNewRepos ref to false if repos is truthy and true if it's falsy. Then inside the effect we can check to see what the value of fetchNewRepos is (via fetchNewRepos.current). If it's true, we need to fetch the new languages repos. If it isn't true, that means it's the initial render and we've already fetched the repos on the server. We then set fetchNewRepos.current to true so that an subsequent renders will trigger a fetching of the new language's popular repos as normal.
And with that, we're finished! The first request will be server rendered and every subsequent route transition after that React and React Router will own as normal.
If you've made it this far, great job. Server rendering with React, as you've seen, is no simple task as React wasn't built with it in mind. In fact, if you're application truly needs server rendering, I'd check out Next.js or Blitz.js which are meta frameworks built on top of React with much more sensible approaches to server rendering (and more).